Before you begin you may want to view my previous post as it leads into this one. If not carry on then.
While teaching in a high school I was instructed to add
as much literacy and math to my teaching in the shop "as possible". Doesn't sound like they hold much hope of any academic gains in "the shop". Apparently we are
having a huge problem with literacy and math in our education system. As the students say, "No duh!"
"No problem", I said, "I can do more than that". I received some strange looks. Is my shirt on backwards? Nope, I can feel the tag behind my neck. It's unfortunate that shops are being used as a dumping ground for struggling students to get course credits. Used properly a shop can provide lots of learning regardless of the student's situation or special needs.
At this point I will climb onto the pulpit and pontificate my message.
Firstly, remove all the machines from the shop. The machines
scare some of the students right out of the class. No more lost fingers
or torn out hair. Lowered insurance costs for the school board.
Machinery maintenance costs gone. More space in the shop for more bench
tops. Healthier breathing environment. With the right teacher and proper supplies a shop can make concrete
connections between academic learning and how it can be applied.
Secondly I would rip those friggen
blinders off of the educators so they can see the whole picture.
Computers will not teach anything. Teacher's teach. Computers are tools for learning. Like a pencil and paper. Use them right and get it right.
Thirdly,
whilst I am drunk with courage, shop class should always be a part of
the curriculum, in fact it should stay a mandatory class everywhere. Not all
students do well with abstract situations. Some can only learn through
physical application of ideas.
In a wood working class you can apply everything learned in all
the other classes at school while outfitted only with hand tools.
I'll prove it to you. Here are some disciplines of study and how they correlate to hands on study in shop class.
Physics: Physics is discovering the fundamental explanations
for observed natural phenomenon and applying them to projects. Wood is
pliable due to it's molecular structure. Strike it with a hammer and it leaves a dent. Why?, refer back to physics.
Math: applied by reading numbers through measurement
using rulers, multiply number of parts, dividing to find centers, laying
out measures on parts. Geometry, you bet, using lines, angles, curves,
squares, rectangles, triangles, circles, all this is used constantly in
wood working.
Statistics: Statistics are employed to help in projecting the future rates of deforestation around the world. Let's take a look at the longevity of the woods we use in the shop.
Logic: In wood working all things must go together in a logical order or it will not fit together. Go ahead, try it, see if it works out.....
Decision
Theory: I quote,"...issues relevant in a given decision, its
rationality, and the resulting optimal decision". If we build a bird house and neglect to drill a hole in it how will a bird get inside to nest in it. No brainer here.
Engineering: Wood has a great weight to strength ration and is a
wonderful building material. Lets put some together in different configurations and see which will support weight.
Language: Reinforced through reading written
instructions on a drawing, writing notes on a drawing. Communication with other classmates through brainstorming ideas for a design.
Arts: Drawing sketches of ideas, keeping
in mind proportion and pleasing the eye by applying the golden mean.
Studying work of the great makers of the past. I would bet Leonardo
Divinci could work wood, he did everything else.
History: Cave dwellers made spears with wood shafts
to kill mastodons. Now that's an interesting history class. Need food,
make spear, get food.
Biology: The wood we
work was once a living tree converting carbon monoxide to oxygen. We
need to breathe for goodness sakes, that's a direct correlation to the
human body.
Chemistry: The tree uses photosynthesis, a perfect example. Think
about it, it's right in front of us every damn day, it's not hard to
understand. Light energy converted to food for the plant. The end result for our class is useable lumber.
Zoology: Trees create habitat for mammals, birds, fish. Field trip please.
Botany: The study of plants, what is wood but a plant.
Earth Science: Study how trees work in the planet's ecosystem. Field trip to a forest.
Life Science: Biologically altered trees to fight
infestations. Infested woods are easily investigated by cutting them
open and looking at the damage caused within the wood. You require working knowledge of a saw to make that happen.
Human Biology: The dust from some woods can affect our
respiratory system and in some cases cause rashes on our epidermis (that's skin if you
flunked biology)
Medicine: Two words here, Rain Forest. The blueprint for aspirin is derived from extracts of willow trees. An interesting fact. Just making connections here.
Social Science: Study the logging industry and how it effects people involved in it. Some families have been loggers for generations.
How would they be affected by a decision to not use wood for structures
anymore? Classic example, you bet.
Geography: Not many trees in Dubai. Wood is harvested only from certain geographical areas. There's your connection.
There are more examples and many ways to test our theories but I'm out of breath.
Can it be funded? Lets look at some numbers because high school funding is all
about numbers. To outfit a wood shop with machines, one table saw, one
8" jointer, radial arm saw, 18" bandsaw, three 14" wood lathes, 24"
planer, drill press, mortiser, sanding station costs roughly (in
Canadian funds) $34,400 before they are even hooked up to electrical power. Lets
include clamps of which you always need one more than you have
(averaging price for all different types $25 each x 50 = $1250) for
assembly, bench vises for holding work ($ 80 x 24 = $1920), 5 to 6
simple maple top square work benches with steel legs seats four students
(approx $600 x 6 = $3600). And don't forget the $ 30,000 for the dust
collection system plus installation. $71,170 (+) is a lot of money for a
school board to put into one classroom to service a small percentage of
the school population. I would hazard a guess that one wood shop could
cost upwards to $200,000 Canadian dollars once all is operational.
Let's hold onto the benches, vises and clamps at $6770.00 and add 24 student tool packages.
A basic set of hand tools for a student, rip and crosscut saw, coping
saw, dovetail saw, jack plane, jointer plane, smooth plane, spokeshave,
set of card scrapers, low angle block plane, sharpening stones, 6", 12" and 24" steel
rulers, 1/4" to 1" 4pc chisel set, mortise chisels 1/4 & 3/8,
combination square, try square, marking gauge, bevel gauge, marking
knife, yankee screwdriver, drill bits and hand drill, wood mallet, small
claw hammer, dead blow hammer. I'll say somewhere in the $1500 to $2000 dollar
range. Could be less but lets plan for the worst. Multiply by 24 students is $48000 plus the rounded off cost of $7000 for benches comes to a total of $55000.
At the time I was teaching I think the average student computer
setup brand new was around $2500 each, and they would put in at least 28
PC's in a lab to cover max student class enrollment. That is 70,000
dollars and it is obsolete in 3 years.
Realistically, tools in a shop can last 15 years before replacement. But the school would probably replace all the tools over that period
piecemeal over that time. So $ 55000 seems a small amount to teach so many
disciplines in one classroom.
If your school board is closing shops down due to costs or insurance issues send them a link to this post. If you know a teacher struggling to maintain a working shop send this post to them. This may be just the ammunition they need. Let's change some minds out there folks.
There, I've said my piece. I have been chewing on this one for a while, May of last year if memory serves me right. I promise to return to blogging wood working projects with lots of pictures and witty insight in my future posts.
Thanks for reading
Ken
Tuesday 28 February 2012
Monday 27 February 2012
Just a thought.
I read a post by wood working hobbyist, Steve Brenam, about his devotion to hand tool use. He is one of a growing group that now use hand tools only. Some do so to harken back to the old days and others due to lack of space or lack of funds for expensive machinery. I believe most is due to the latter.
When I was younger I would have dismissed him as some kind of nut. Why use muscle power when a machine can do the grunt work. Why go back to hand tools when so many embraced machines at the turn of the 20th century. Machines are faster, bigger, louder, painted that nice green colour, and look so cool in the shop, Yes!!!!!!!!!!!!!!!!!!!
"So what have you built lately", they ask?. Umm.... this little jewelry box and a coat rack answers the hobbyist.
Speedy results are not required by the hobbyist. Oh, to think of all the time I could have been wood working instead of waiting for machinery. Today I use machinery for heavy work and I like my hand tools as well. I use whichever will best suit the job at hand.
Getting back to Steve, he is a wood worker and wood working is a craft where one uses their hands to create unique articles made from wood. Makes sense doesn't it?
Steve believes in learning, doing and teaching someone else what you have learned. He does a great job of that with his blog.
I came upon Steve's blog through a link from another blog written by Oldwolf. I came across the Oldwolf through a Google search, not sure what it was, but I liked his honest writing style and modest demeanor. Oldwolf (his blog) has a strong interest in carving. He started blogging about his journey from beginner to where he is today. His knowledge of the craft grows steadily and his work gets better all the time and he uses mostly hand tools much like Steve. Oldwolf has a few small machines in his little work shop as well, but no heat for the winter months. This year to work during the cold months he moved his hand tools to his house and set up a workshop in part of the dining room. His wife must really love him and his work.
While furniture for instance can be made from wood, it is not always wood working but manufacturing. There is no craft in manufacturing. Manufacturing is all about compromises in order to attract as many people as possible to your product. Damn you Ikea.
When I was in high school I always enrolled in cabinet making class. The room was full of machines and very little hand tools. This led me to the belief that machines were a must. Why would school teach me something that is not true? So naive. Silly really, how much time do you have to work on something large in school. Not much. Which brought me around to thinking of the year I taught shop in a high school and also instructed local college night courses on cabinet making there.
This was a beginner class and the college night classes always had full enrollment. I taught them how to use all the different power tools as they constructed pine blanket boxes with most coming together quite nicely. On one of the last nights a student came to me and said their project was a failure. "It's a little crooked and uneven in spots", he said. I looked it over (he just lacked patience, the hardest thing to learn) and told him it was wonderful job as it had been brought to completion. After all, that was what he came for in the first place, to create something with his own hands. "Was it enjoyable building this", I asked him. He thought for a moment then the smile came back to his face and he said, "Yes, it was". I believe anyone can work wood. If you were fortunate enough to have attended grade school you were given all you need to do this. Most just need some instruction in the physical use of tools and the courage to try and fail, learn from the mistake and try again. If that student continues he/she will improve just like everyone else does.
I think the college is missing the mark here for the beginner anyway. Not one of these students had aspirations to go and work as a cabinet maker. They just wanted to build something for themselves and have the satisfaction of telling others that they made it.
You may be able to see the hook here. If they want to continue they can sign up for the next course and build another project of their choice. Good for the college coffers but not beneficial to the student in my opinion. It is difficult to complete something properly if you are constantly under the gun for time. Hell you might as well stay at work for an extra four hours one day a week for the next 10 weeks.
Wood working should be relaxing and allow you to find out something about yourself. More like Oldwolf and myself. Do you think Oldwolf might have been a little discouraged had he taken the college course. I bet he would. Not because of his ability but by thinking the tools may be beyond his means as they are for many people. Classes like that really give the wrong impression about wood working.
Some students could not attend all classes due to family or work. How do you complete your project if you do not have machinery at home???? A class using hand tools would be a better option for the beginner and students could purchase hand tools and work at home if they really wanted to continue with what they learned. Hand tools don't require a huge shop, just a corner to set up a work bench and enough room to swing a board around.
You know all this brings me around to the epidemic of school boards mothballing shop classes. I believe they are doing a great disservice to many students. I don't think I would ever have stayed in high school with out shop classes. Academically I passed but I didn't feel I was learning new things.
Just expanding on the old and it became more abstract and I couldn't see myself using say, Algebra at the grocery store checkout. Or correcting the cashier's grammer by using squiggly underlines and such taught in English class. Maybe I'd take some grocery bags in each hand and jump up onto the conveyor belt, swinging the bags around wildly to gain attention and launch into a soliloquy about the effect of too many hormones in our food, and the economics of shipping our raw goods to China so they can manufacture things and send them back to us for our consumption whilst burning tons of fossil fuels in the process further polluting ................... ahh, we've all heard that before.
I'm going to collect my thoughts and put it on my next blog post. I'm not done with this yet. I going to put it out there and see if we can make a case for hands on studies.
As always, thanks for reading.
Ken
Saturday 25 February 2012
Old Man Winter makes an Appearance
Looking out the shop window yesterday made me happy to be inside the shop. Eventually the driving snow let up so Jack and I went out and had a look around.


I hope you enjoyed our little walk around the yard.
Thanks for reading
Ken

View out the shop window at the workbench.

There's Jack, nose to the ground as always.

I store some lumber in the old barn that hides behind the trees.

The abandoned orchard next to our place is turning into a forest.

I thought this would make an interesting photo.

Four cord of wood left of the six I started with. Last year we used seven cords. Definitely warm this winter.

Nice and warm in the shop.
I hope you enjoyed our little walk around the yard.
Thanks for reading
Ken
Tuesday 21 February 2012
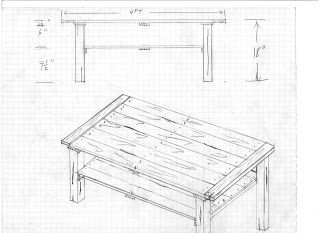
Rustic Coffee Table
Here is a fun one, someone asked me if I could make a coffee table for them. They wanted one that consisted of distressed wood. They would like it to look older and more "country" style. Colour wasn't really a factor but they figured a dark colour would be best for them.
I imagined something like a shed door from an old western movie perched on some squared legs with a shelf underneath, nail heads showing, splits and knotholes, saw marks on the boards, tumbleweeds floating by while two gunslingers face each other at high noon................ please read on while I finish watching Clint Eastwood.
Hmmm..... distressed wood. Where do I get that. I don't really want to take new wood and try to make it look old. That's a heck of a lot of work when time and the elements have already done that for me. Just need to find where mother nature left it. A search ensued and fortunately it wasn't a lengthy one. With distressed wood on hand I toiled to turn my vision into reality.
It's a big change trying to work with wood that is not flat, straight, even in thickness and has more dam quills than a porcupine. At least half a dozen slivers in the first five hours. I felt like Les Nessman, he did the hog report and weather on the old sitcom 'WKRP in Cincinnati', bandages everywhere. Oh and add on a showering of antiseptic.


Well that's it for now, I'm going back in the shop and change my bandages and get back to the other projects.
Thanks for reading,
Ken

I imagined something like a shed door from an old western movie perched on some squared legs with a shelf underneath, nail heads showing, splits and knotholes, saw marks on the boards, tumbleweeds floating by while two gunslingers face each other at high noon................ please read on while I finish watching Clint Eastwood.

This is what I came up with, I still draw em old school.
Hmmm..... distressed wood. Where do I get that. I don't really want to take new wood and try to make it look old. That's a heck of a lot of work when time and the elements have already done that for me. Just need to find where mother nature left it. A search ensued and fortunately it wasn't a lengthy one. With distressed wood on hand I toiled to turn my vision into reality.
It's a big change trying to work with wood that is not flat, straight, even in thickness and has more dam quills than a porcupine. At least half a dozen slivers in the first five hours. I felt like Les Nessman, he did the hog report and weather on the old sitcom 'WKRP in Cincinnati', bandages everywhere. Oh and add on a showering of antiseptic.

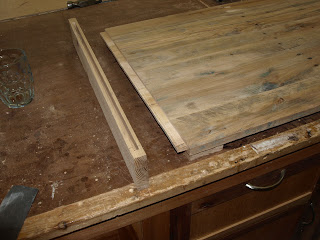
I screwed the top boards to some battens to keep them in place.

On the ends of the top a tongue was formed to fit into the dado in the breadboard end that will slip on to the end of the table.

Breadboard ends pegged into place with some maple dowel. I'll trim the ends to be just a little longer than the top is wide for expansion purposes then join the top to the lower assembly. To fill the old nail holes in the center of the boards I grabbed some square cut nails and cut some off their length off and then hammered them in. Now that looks down right rustic.

There are some more square cut nails in the ends of the shelf boards for some old school looks. I was having so much fun at this point that I neglected to take some shots with the camera while building the lower shelf and attaching the legs.
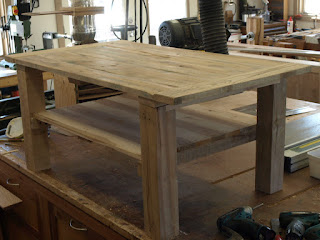
Here you have it, ready for some final sanding to make sure the porcupine is naked.
Here you have it, ready for some final sanding to make sure the porcupine is naked.

Looking lovely with a coat of oil finish on it. Tomorrow the table will receive a coat of poly to seal it up. You many notice the leg on the left has a nice spot for a squirrel to store it's nuts for the winter.

You can see a nice gouge on the top in this pic.
Well that's it for now, I'm going back in the shop and change my bandages and get back to the other projects.
Thanks for reading,
Ken

Thursday 16 February 2012
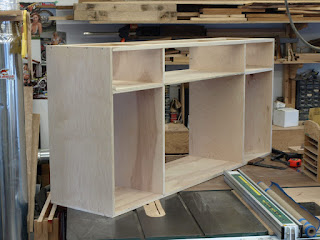
Buffet Cabinet
This will be the first post of a buffet cabinet for Regan. I had some maple on hand so we will use it. The carcase of the project will be plywood to save some time. Less wood movement to deal with as well. The back of the cabinet will have frame and panel construction. I really don't like just whacking in a sheet of thin plywood on the back after doing all that nice work on the front. Again the wall will give thanks for the nice view.
The cabinet will have a modern look but the flush joinery on the face of it will make for some exacting work.


Next post on the buffet will show you how the doors are made and the drawers.
I'll be working on the oak table again next week so should have an update on the trestle arches coming up too.
Have a great weekend.
Thanks for reading,
Ken
The cabinet will have a modern look but the flush joinery on the face of it will make for some exacting work.
Following are some pictures of the carcase and face frame work this week.

Parts cut to size and slotted to lock parts together.

This will be the frame that sits under the top panel.

Here is the carcase. Next I'll surround it with framing and legs in the same manner as the TV console.

Here is the maple that makes up the legs, front and back framing, door frames and drawer fronts.

Legs mortised and cut to receive the carcase and face frame parts.

Tenons ready to fill those mortises.

Shape a long curve on the legs. I'll bring that mug back some day Bob.

Put all those parts together and we have a front panel assembled.
Rear panel glue up.

Front view of carcase and face frame assembled.

Rear view, the wall will love it.

Panels around the carcase, next comes the doors and drawers.
Next post on the buffet will show you how the doors are made and the drawers.
I'll be working on the oak table again next week so should have an update on the trestle arches coming up too.
Have a great weekend.
Thanks for reading,
Ken
Saturday 11 February 2012
From Prototype to Real Thing
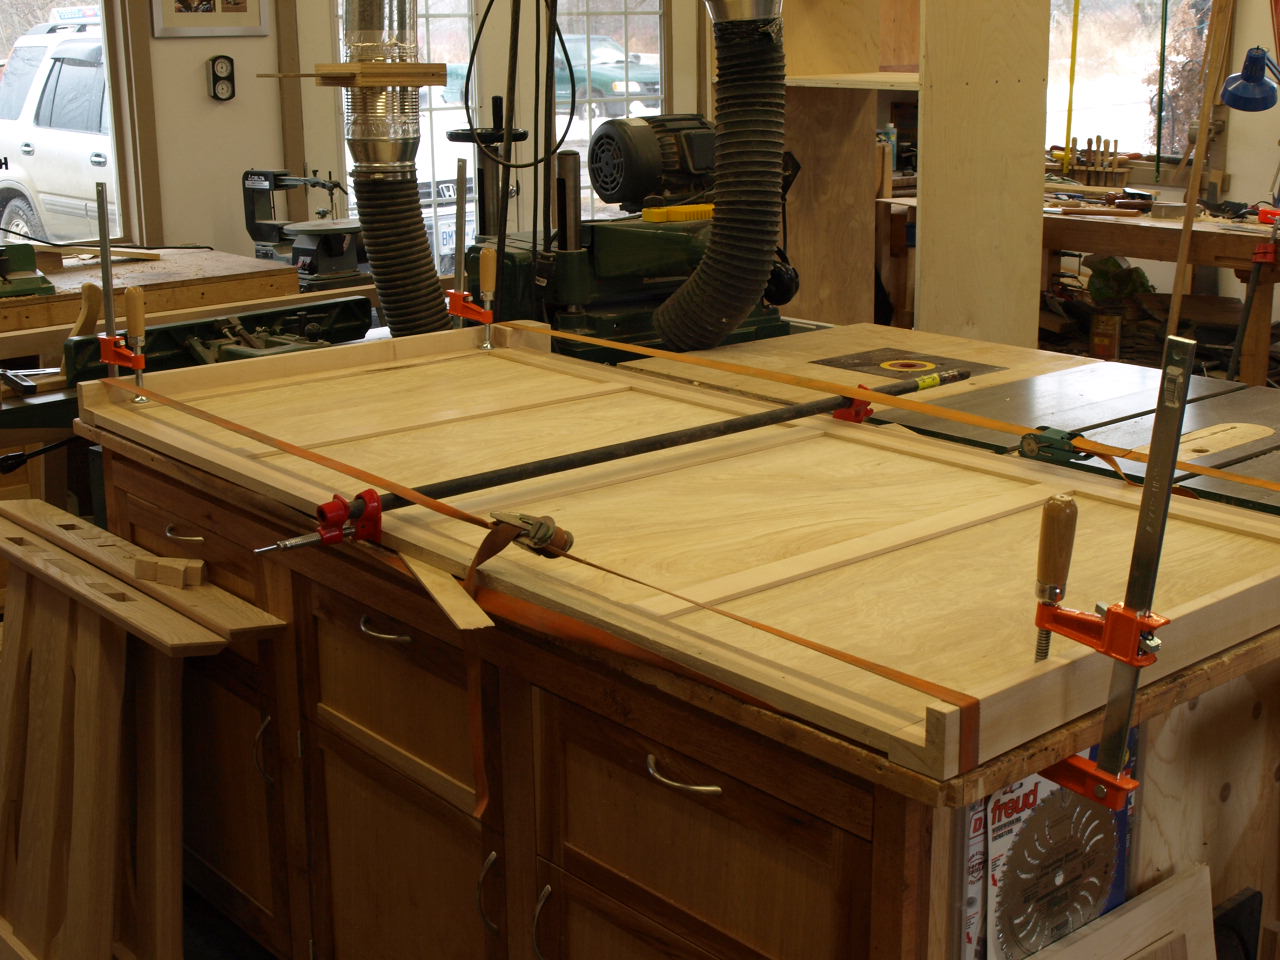
An update on Brent and Denyse's dining table. I have machined and assembled the trestle ends and they are ready for glue. Click on the pics for a bigger size.


Thanks for looking
Ken

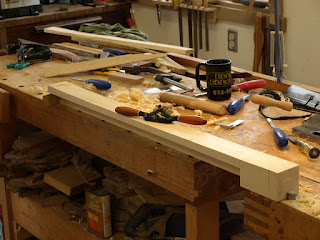
Now that the parts are dimensioned we go to the table saw, install the dado blade set (pronounced like day-dough, everyone together now..... excellent) to cut stopped dadoes (grooves) in the edge of the trestle legs. When the pencil lines on the throat plate in the picture line up with pencil lines I marked on the side of the legs we will know that is where we stop cutting and lift the wood off of the blade.

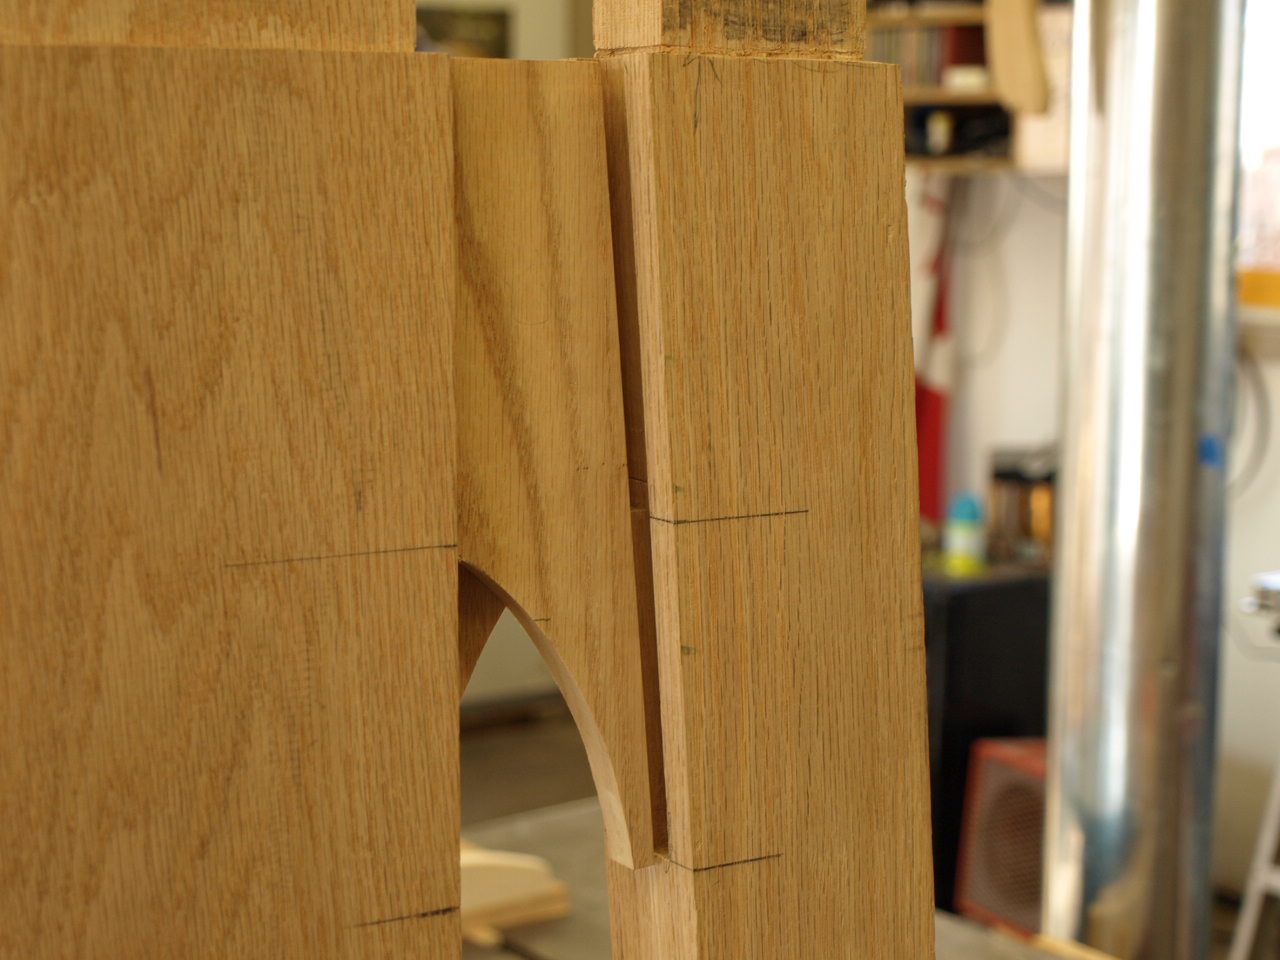
Then we'll go to the workbench and use a chisel and mallet to square up the end of the dado grooves where we made our stopped cuts on the table saw.

Now the squared up dado is ready to receive the curved parts that will fill in some of the space between the trestle legs.

These add a nice arched look and still allow for expansion and contraction across the width of the leg parts.
Same for the top ends.

Now the other side.

They should look awesome with the trestle that I have planned to go in between them.

More to come
Thanks for looking
Ken
Thursday 2 February 2012
Prototypes, Saving Time and Material
I am building a large dining table for my friend Brent. He gave me a size for the surface and specified no leaves in the table. The rest he is leaving to me.(no pun intended). We agreed on something hefty looking made with oak. Finish color to be worked out later. Maybe a little bit of hammered steel could be incorporated into the build too. That got me thinking medieval style but the design is changing as I go.
I looked around the internet and found something made by a wonderfully skilled group in Vermont led by Dan Mosheim. I made a very similar model to theirs so Brent could have a look.

The table we will end up with will look quite different but the overall look of heaviness will still be there. I don't like the idea of copying another man's designs but inspiration must start somewhere. When looking for inspiration always look at the best work you can find. It will go a long way in elevating your own work.
I am using spruce building lumber to make a full size prototype to help with incorporating ideas to make this table our own. I have noticed a lot of wood workers using mockups so they must gain some benefit versus the time to build them. Also we get a funky table for the yard once it's done.

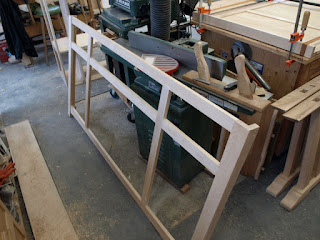
To lighten the table I decided to leave some open areas on the table trestle ends. This may lessen the amount of wood movement across the area that a solid piece would have. They looked a little plain so I added in these curved pieces between the centre and the angled parts on the outside. The pieces lay upon each other and will be set into grooves on the leg parts. They will be loose on the one side to allow for movement across the width of all the members.


I put in this beam to tie the ends together but the oak table will have a much different look. I decided the curved parts in the end assemblies looked a bit Gothic.
I kicked around the net for a while and found this picture of a Gothic style rafters in Westminster Hall.
 A full hammer beam arch under the table would be cool but not practical. The part of the rafter that caught my eye is the lower portion attached at the angelic statue and runs down to the wall with the two curves merging together. One end could attach to the underside of the table and the shorter end could go against the trestle ends. Adding in the ogee 3 leaf design in the void would look good. Maybe that part could be hammered steel.
In the end we could say the table is Neo - Gothic I suppose. Anyway some more thinking time while I am machining the parts for the trestle ends. I am also starting a buffet cabinet soon. More to come.
Thanks for reading
Ken
I looked around the internet and found something made by a wonderfully skilled group in Vermont led by Dan Mosheim. I made a very similar model to theirs so Brent could have a look.

The table we will end up with will look quite different but the overall look of heaviness will still be there. I don't like the idea of copying another man's designs but inspiration must start somewhere. When looking for inspiration always look at the best work you can find. It will go a long way in elevating your own work.
I am using spruce building lumber to make a full size prototype to help with incorporating ideas to make this table our own. I have noticed a lot of wood workers using mockups so they must gain some benefit versus the time to build them. Also we get a funky table for the yard once it's done.

To lighten the table I decided to leave some open areas on the table trestle ends. This may lessen the amount of wood movement across the area that a solid piece would have. They looked a little plain so I added in these curved pieces between the centre and the angled parts on the outside. The pieces lay upon each other and will be set into grooves on the leg parts. They will be loose on the one side to allow for movement across the width of all the members.


Here's what they look like standing together.

I put in this beam to tie the ends together but the oak table will have a much different look. I decided the curved parts in the end assemblies looked a bit Gothic.
I kicked around the net for a while and found this picture of a Gothic style rafters in Westminster Hall.

In the end we could say the table is Neo - Gothic I suppose. Anyway some more thinking time while I am machining the parts for the trestle ends. I am also starting a buffet cabinet soon. More to come.
Thanks for reading
Ken
Jointer Tuneup
Hello All
This post may be of more interest to the woodworkers than to the wood admirers. But as always I will try to keep it interesting. So let's get on with it shall we.
I was suddenly having a little problem with my machined lumber ending up with a banana shape to them. You couldn't really notice to look at the board but when you would get to joining the boards together I noticed something funky was going on around here.
I narrowed it down to my jointer (see photo below) a machine that one uses to flatten the surface of a board by passing it over the cutter head in between two coplaner tables. Coplaner a definition: "a set of points in space is coplanar if all the points lie in the same geometric plane". Easy eh? Think like parallel to each other kinda like.
After the surface is flat you hold the flattened face up against the fence of the jointer and run the edge of the board over the cutter head repeatedly until your edge is square in relation to the flattened face. Simple eh? Yes I'm from Canada eh.

I showed my shop assistant Jack (yellow lab) the offending piece. He is quality control. Jack gets up and wanders around sniffing this and that and he wags his tail letting me know all is good. Then he returns to his area and lays back down to nap.
Jack's moves reminded me of a boss I once worked for. He was known as the 'seagull'. He would come into a room, make a lot of noise, crap all over everything we had done, then leave.


I found the problem lay in the 'ways' (located at the joint running at an angle under the black thingy on the green surface in photo above). The ways are the part that the table slides up and down upon. The ways can become warn over time. I think in my case the poor machining by the manufacturer is to blame. Also the table could be warped which is a real hard one to solve.
It's tear down time baby, get those sleeves rolled up. Jack let out a big sigh and laid his head back down. Don't need his help anyway.
First unplug the machine from it's power source, very important. Off with the blade gaurd, the fence, the stop screws from the side that keep the table tight to the ways, then the part that the fence slides upon.

Bring on the straight edge. After placing the straight edge on the front table I raised the rear table until it met the straight edge. Hmmm... I see the front end of the rear table is low on both edges and the rear end is low on one corner. Need to fix that for sure or nothing will be straight.
I consulted the woodworking oracle called The Jointser Manuol. These imports need better proof readers for their manuals. In black and white was the answer, I quote, "must shim ways brass the to get rear table upon making co-plunesness. HUH ??????
After consulting a Taiwanese to English phrase dictionary it became apparent that I would have to improvise for shim stock as I didn't have any brass material. Aluminum should last me a while as I rarely move the table up and down. I needed to find some aluminum. Cans are aluminum I remembered. Now where will I get one of those. You can see in the next photo a source was located.
 So I cut the aluminum into a few narrow pieces and put one on each side at the upper ends of the ways. This will raise the front end of the table. Next place one at the bottom on one side to bring the rear corner of the table up then tightened the locking screws on the ways. The two tables are now co-plunesness.... I mean coplaner.
I replaced the parts that were removed earlier, made certain the cutter blades were correctly set, checked the power switch was set to off and then plugged the machine back into power.
I could hear Jack stirring then he headed over to me. All the work is done, just the glory left. I grabbed a board, flipped on the switch and ran the board across the cutter. It made a nice even buzzing noise as the sharp blades took a thin layer off the board. One jointer working fine I reported to Jack as he cocked his head to one side and wagged his tail. Thanks for all your help Jack.
I see by the clock it's around 2:30pm, Jack is reminding me it is walk time. As is the custom we'll go down through the edge of the abandoned orchard for his daily constitutional. It's a nice day maybe we will take the long way back and have a look in the forested area beyond the orchard. We had a big windstorm a while ago, may find a fallen prize back there.
Thanks for your time.
Ken
Oh, and Jack says thanks too.
This post may be of more interest to the woodworkers than to the wood admirers. But as always I will try to keep it interesting. So let's get on with it shall we.
I was suddenly having a little problem with my machined lumber ending up with a banana shape to them. You couldn't really notice to look at the board but when you would get to joining the boards together I noticed something funky was going on around here.
I narrowed it down to my jointer (see photo below) a machine that one uses to flatten the surface of a board by passing it over the cutter head in between two coplaner tables. Coplaner a definition: "a set of points in space is coplanar if all the points lie in the same geometric plane". Easy eh? Think like parallel to each other kinda like.
After the surface is flat you hold the flattened face up against the fence of the jointer and run the edge of the board over the cutter head repeatedly until your edge is square in relation to the flattened face. Simple eh? Yes I'm from Canada eh.

I showed my shop assistant Jack (yellow lab) the offending piece. He is quality control. Jack gets up and wanders around sniffing this and that and he wags his tail letting me know all is good. Then he returns to his area and lays back down to nap.
Jack's moves reminded me of a boss I once worked for. He was known as the 'seagull'. He would come into a room, make a lot of noise, crap all over everything we had done, then leave.

I handed the banana shaped board to Jack. Jack hates crooked wood.

I found the problem lay in the 'ways' (located at the joint running at an angle under the black thingy on the green surface in photo above). The ways are the part that the table slides up and down upon. The ways can become warn over time. I think in my case the poor machining by the manufacturer is to blame. Also the table could be warped which is a real hard one to solve.
It's tear down time baby, get those sleeves rolled up. Jack let out a big sigh and laid his head back down. Don't need his help anyway.
First unplug the machine from it's power source, very important. Off with the blade gaurd, the fence, the stop screws from the side that keep the table tight to the ways, then the part that the fence slides upon.

Bring on the straight edge. After placing the straight edge on the front table I raised the rear table until it met the straight edge. Hmmm... I see the front end of the rear table is low on both edges and the rear end is low on one corner. Need to fix that for sure or nothing will be straight.
I consulted the woodworking oracle called The Jointser Manuol. These imports need better proof readers for their manuals. In black and white was the answer, I quote, "must shim ways brass the to get rear table upon making co-plunesness. HUH ??????
After consulting a Taiwanese to English phrase dictionary it became apparent that I would have to improvise for shim stock as I didn't have any brass material. Aluminum should last me a while as I rarely move the table up and down. I needed to find some aluminum. Cans are aluminum I remembered. Now where will I get one of those. You can see in the next photo a source was located.

I replaced the parts that were removed earlier, made certain the cutter blades were correctly set, checked the power switch was set to off and then plugged the machine back into power.
I could hear Jack stirring then he headed over to me. All the work is done, just the glory left. I grabbed a board, flipped on the switch and ran the board across the cutter. It made a nice even buzzing noise as the sharp blades took a thin layer off the board. One jointer working fine I reported to Jack as he cocked his head to one side and wagged his tail. Thanks for all your help Jack.
I see by the clock it's around 2:30pm, Jack is reminding me it is walk time. As is the custom we'll go down through the edge of the abandoned orchard for his daily constitutional. It's a nice day maybe we will take the long way back and have a look in the forested area beyond the orchard. We had a big windstorm a while ago, may find a fallen prize back there.
Thanks for your time.
Ken
Oh, and Jack says thanks too.
Subscribe to:
Posts (Atom)