I was wandering around
Legacy Building Supplies in Cobourg looking at the many wonderful things they have there. They are the King Solomon of old building materials. The place is beyond explanation, you have to experience a visit.
Everything is within view or touch and all of it in excellent working order. This is not a junk yard but a treasure trove of old irreplaceable and unique items from the past.
The sign above the stair opening leading down from the main level stated, "More down here". To my mind that read as "last chance for the cheap stuff" or " handy man corner". I descended the stairs with giddy delight. I bet this is how
Red Green feels at a rummage sale.
There is a musty smell. Some window fans blow the heavy air around in an attempt to keep the humidity out. It gives the feeling of walking in a cave. I know I will find something as not many will venture down here.
Meandering through the subterranean portion of the building I feel like I am in a labyrinth. Rows of old doors and window sashes, bannister parts, signage, glass, chairs, tables making up the walls of the tunnels. I walked stealthily so as not to warn the prize find of my presence. Eyes scanning dark corners for items that are a bargain. I spot something, 2 matching maple banister parts. I pounce and grasp them with my bare hands. They are dirty and the finish all cracked. Some damage on the end of one of them. The price is right. I bundle them under my arm and continue my search with renewed vigor. My find an indication that hunting is good today. I scan the herd of misfit items watching for more quarry. I start to feel like a big game hunter. Maybe I should have brought some porters for help. My cheap seeking brain homes in on slightly damaged small chair. The note on it screamed "Project Chair". I moved quickly and slayed the beast and carried it up the stairs along with its smaller bretheren banister parts. I advanced to the counter to pay the tariff on my bounty.
"Interesting finds?" the owner asked.
I thrust my items into the air and said, "Yes, hunting was good today."
"Lovely", cooed the clerk.
We finished the transaction and she bundled up my banister parts. I hoisted the chair onto my shoulder, tucked the banister parts under my arm.
"Thanks, and come back soon", she said.
I envision a new hunt in the future. Today's safari was a success. I loaded my plunder into the land rover (toyota corolla) and set off across the plains of the Serengeti (gravel parking lot) to return to my village.
 |
| The plan for a small pedestal table with one of the parts. |
 |
| Sliding dovetails hold the legs to turned section. |
 |
| The other banister part became this lamp. |
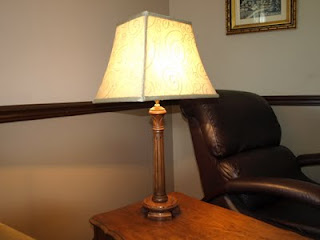 |
| I built a small base for it out of maple then stained the whole works and finished with polyurethane. |
If I hadn't come across these parts they may have been lost from sight for many a year. Together Legacy and myself have kept something from becoming just another piece of junk in the landfill. It may have become firewood but I don't think the heat generated would have kept us warm for long. Here's to another hundred years.
As for the chair it is still waiting for me. I 'll make a post for that one. It will involve repairs, new parts and an upholstered seat. Should be fun.
Thanks for reading.
Ken


